I just installed NixOS on my laptop. This is a summary of my experience.
I hope you find it useful if you’re new to NixOS or setting up full disk
encryption. Feel free to tweet questions at me and I’ll help if I can,
though you’ll find more knowledgable folks in the #nixos channel on
Freenode.
I keep my NixOS configuration in a git repository. I recommend learning from other people’s configuration files and sharing your own.
Much of this follows Bluish Coder’s Installing NixOS on a ThinkPad W540 with encrypted root and Encrypted Root on NixOS on the NixOS wiki.
My requirements, constraints, and choices
- The hardware: Samsung Series 9 NP900X4C-A06US
- Replacing the entire disk’s content, preserving nothing.
- Must have encrypted root and swap.
- Laptop has no CD drive, so must boot from USB.
- Laptop has no ethernet port, so must use wifi (more specifically, WPA) during installation.
- UEFI boot.
Preview
Here’s what it’s going to look like once NixOS is installed.
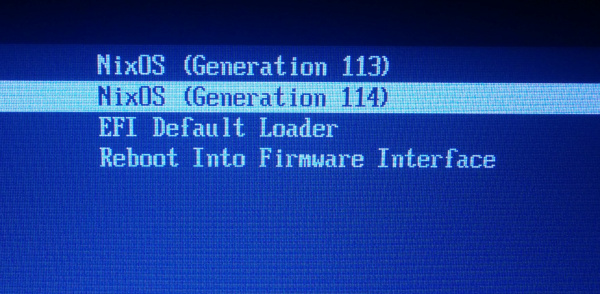
The boot loader
Here’s what my boot loader looks like after I’ve been using this system for a couple weeks and have rebuilt the configuration 114 times.
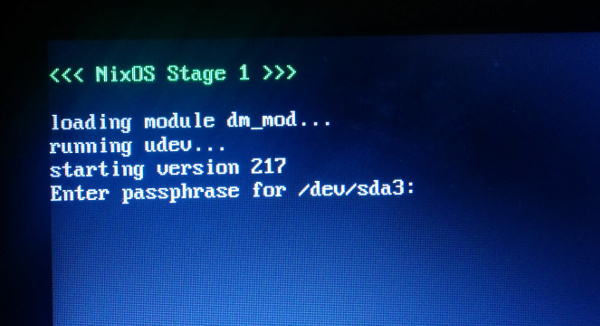
Unlocking the encrypted disk
In the first stage of the boot process, NixOS stops to let you enter the passphrase before proceeding.
The default login prompt
Creating NixOS USB installer
Download NixOS 15.09.336.83cc494 x86_64 minimal install ISO.
(I first tried the latest stable release, 14.12, and had an error installing Grub. I switched to this particular build of NixOS 15.09 on Domen Kožar’s recommendation.)
Load it onto a flash drive using unetbootin.
(I don’t know if there’s a better way to do this. Creating USB install media is still a huge mystery to me; I don’t get why it’s so complicated or why there’s seemingly no authoritative method.)
The volume label must be NIXOS_ISO:
sudo mlabel -i <device> -s ::"NIXOS_ISO "Note the spaces that pad the label name to exactly 11 characters.
Boot the NixOS live “CD.” It contains the utilities that you’ll need to set up the disk, and of course the NixOS installer.
Disk layout
Here’s a somewhat high-level depiction of the disk we’re about to set up.
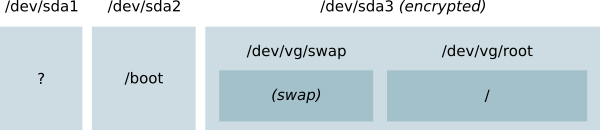
There are three partitions:
/dev/sda1is the BIOS boot partition. Don’t ask me exactly what this is for, all I know is it has to be there./dev/sda2will be mounted at/boot. This is unencrypted, because the boot process will need it before we unlock the encrypted volume./dev/sda3is the encrypted partition.
The encrypted partition contains an LVM volume group called vg, which
contains two logical volumes:
/dev/vg/swapwill be used as swap space./dev/vg/rootwill be mounted at the root of the filesystem,/.
Create partitions
Run fdisk -l to show disks. Mine is /dev/sda.
Use gdisk to create the partitions.
gdisk /dev/sdaI won’t teach you how to use gdisk here, but create a partition table
that looks like this:
Number  Size        Code  Name
  1     1000.0 KiB  EF02  BIOS boot partition
  2     500.0 MiB   EF00  EFI System Partition
  3     <the rest>  8E00  Linux LVM
Set up LUKS
Initialize the encrypted partition. This will prompt you to create a passphrase (which can be changed later, so don’t fret if you haven’t generated a good one yet).
cryptsetup luksFormat /dev/sda3Then open it:
cryptsetup luksOpen /dev/sda3 enc-pvI have no idea what enc-pv means here, I’m just following instructions.
Create LVM group and volumes
This allocates 10G for swap, and the rest for the root volume.
pvcreate /dev/mapper/enc-pv
vgcreate vg /dev/mapper/enc-pv
lvcreate -n swap vg -L 10G
lvcreate -n root vg -l 100%FREE
Format partitions
mkfs.vfat -n BOOT /dev/sda2
mkfs.ext4 -L root /dev/vg/root
mkswap -L swap /dev/vg/swap
Installation
Mount
Now mount all the disks and volumes you just created. But not where we said we were going to mount them.
The NixOS installer treats /mnt as the filesystem root for the installation.
So instead of mounting to / and /boot as we discussed above, for now
we’re going to mount them to /mnt and /mnt/boot instead:
mount /dev/vg/root /mnt
mkdir /mnt/boot
mount /dev/sda2 /mnt/boot
Also activate the swap space:
swapon /dev/vg/swapConfiguration
Run this to generate config files:
nixos-generate-config --root /mntThis creates two files in /mnt/etc/nixos:
configuration.nix, a default config file. (You’ll be making changes to this a lot).hardware-configuration.nix, the results of a hardware scan. (You don’t edit this.)
Add this stuff to the configuration.nix:
boot.initrd.luks.devices = [
  {
    name = "root";
    device = "/dev/sda3";
    preLVM = true;
  }
];

boot.loader.grub.device = "/dev/sda";

networking.wireless.enable = true;
Hopefully its meaning is mostly self-explanatory, as NixOS configuration tends to be.
Wifi
Disable the wpa_supplicant service that’s running, and run it yourself
specifying the WPA credentials.
systemctl stop wpa_supplicant.service
wpa_supplicant -B -i interface -c <(wpa_passphrase 'SSID' 'key')
I’m not sure why, exactly, but that’s what the wiki says to do.
If you reboot during this process
After you’ve created the partitions and LVM volumes, here’s a recap of everything you need to set up when you boot from the install media again.
cryptsetup luksOpen /dev/sda3 enc-pv
lvchange -a y /dev/vg/swap
lvchange -a y /dev/vg/root
mount /dev/vg/root /mnt
mount /dev/sda2 /mnt/boot
swapon /dev/vg/swap
systemctl stop wpa_supplicant.service
wpa_supplicant -B -i interface -c <(wpa_passphrase 'SSID' 'key')
Install
nixos-installIf that succeeds, then reboot and proceed to boot into your new NixOS install.
rebootYour first NixOS boot
At this point, there is now a ton of fun stuff to learn that is outside the scope of this walkthrough. I’m just going to cover the a little bit of essential configuration to get you started in a graphical environment.
Connect to wifi again
We’ll get a network manager set up soon, but for now run these commands again to get back on wifi.
systemctl stop wpa_supplicant.service
wpa_supplicant -B -i interface -c <(wpa_passphrase 'SSID' 'key')
Add the 15.09 package channel
In a root shell:
nix-channel --add http://nixos.org/channels/nixos-15.09
nix-channel --update
Editing the config file
You’ll be editing /etc/nixos/configuration.nix a lot.
When you do, run nixos-rebuild switch to apply the changes.
Create a user
Here’s my initial user config:
users.extraUsers.chris = {
  name = "chris";
  group = "users";
  extraGroups = [
    "wheel" "disk" "audio" "video"
    "networkmanager" "systemd-journal"
  ];
  createHome = true;
  uid = 1000;
  home = "/home/chris";
  shell = "/run/current-system/sw/bin/bash";
};
Its password obviously doesn’t go in the config file, so you have to run this command to set it:
passwd chrisEnable graphical environment
Add this config to enable KDE and the touchpad:
services.xserver = {
  enable = true;
  desktopManager.kde4.enable = true;
  synaptics.enable = true;
};
(I haven’t used KDE in a long time, but I decided on a whim to try it again—and I am delightfully surprised by how it has improved.)
Enable network management
Now you’ll want to turn on the network manager which can manage your
WPA keys so you don’t have to keep manually messing with wpa_supplicant.
Replace
networking.wireless.enable = true;with
networking.networkmanager.enable = true;Also add kde4.networkmanagement to the package list to get a GUI for it.
Reference documentation
If you add this config:
services.nixosManual.showManual = true;Then ctrl+alt+F8 gives you the manual in a terminal, which may be nice to keep around in case of emergency.
nixos-help opens the manual in a browser window.
nixos-option is a good reference for the configuration options.
To search for packages, use nix-env -qaP | grep ....
The left column shows attribute paths (which is what you need for
systemPackages in the config), and the right column shows package names.